How to adapt the Stampin’ Up! Tombstone Treat Boxes into a Haunted House Box.

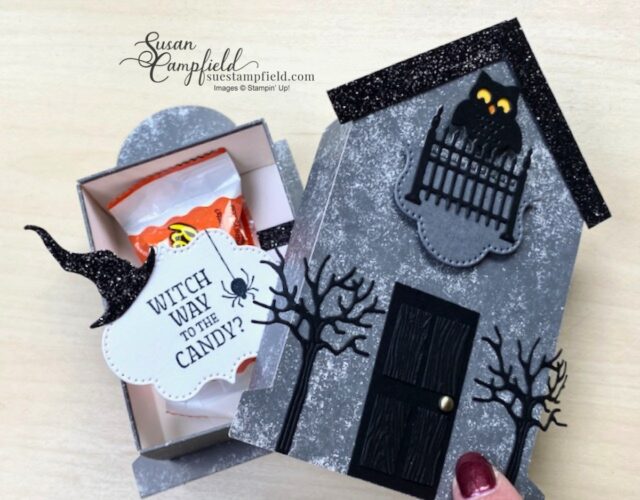
This adorable Haunted House box is perfect to fill with treats and gift to your family, friends, or co-workers for Halloween! This house is actually the Tombstone Treat Box from Stampin’ Up!, but with just a few modifications, it becomes a spooky cute house to fill with yummy ghosts! Below is a video tutorial and a PDF project sheet with all the dimensions and supplies. But first, let’s take a closer look at what is inside the box!

Our Haunted House box hides another surprise inside – the greeting pops out at you when you open the box!
The Haunted House lid holds the greeting down, but once it comes off… up it pops!

This owl die is SO cute! It is from the Frightful Tags Dies which can be purchased separately or as part of a bundle with the Frightfully Cute stamp set for a 10% savings. I share a simple trick in the video below on how to make his yellow eyes and orange beak.

The panels on the “door” are embossed with the timber 3D embossing folder and the “doorknob” is one of the Brushed Metallic Adhesive Backed Dots. The fence die and one of the label dies cut in half from the Frightful Tags Die set makes a perfectly “spooky” balcony.

At the very bottom of the box, under the candy, there is a another hidden message – Happy Halloween to you!
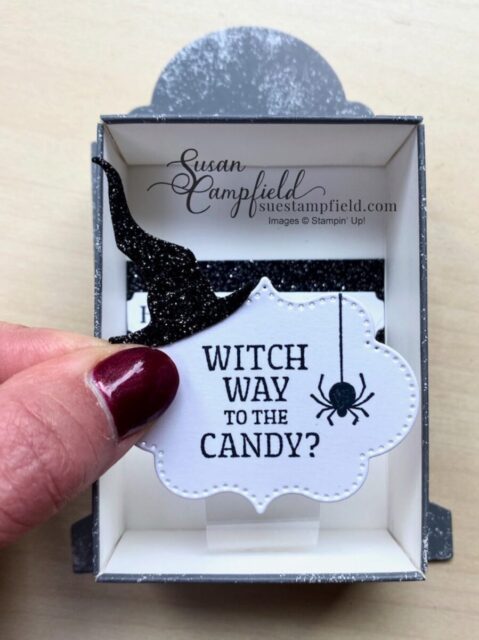
This is the pop up message. The witch’s hat from the Frightful Tags dies is super cute when cut from the Black Glitter Paper!

Shhhh, don’t tell! Here is the secret to our pop up – a 7/8″ piece of Window Sheet, adhered with Tear & Tape. The Window Sheet is bendable but never loses it’s stiffness – so it will always “POP”.
Video Tutorial and Project PDF Document
Ready to make this fun project? For a PDF document with all of the measurements and supplies listed for this project, click HERE. Then watch the video above!

In the Halloween Haunted House video above I mentioned this Dracula project. For details on the project, visit this blog post.

Or for the blog post and video on how to make the Frankenstein with the Penguin Builder Punch, click here.

After Halloween (and when the candy is eaten!), the box can be saved as a Halloween decoration for next year. Thank you for letting me share this adorable project with you today! For more fun and creative projects, you can subscribe to my blog and weekly project sheet emails HERE. The supplies used for this project are shown below, click on the image to view the item in my online Stampin’ Up! store. Thank you!